How to Replace a Rubber Roof on a Camper
As an ardent camper, one of the most critical maintenance tasks you’ll face is replacing your camper’s rubber roof. A task that may seem daunting, but with the right guidance, can be accomplished with ease. Over time, exposure to the elements can cause your rubber roof to deteriorate, leading to leaks and interior damage.
This not only impacts your camping experience but also reduces the lifespan of your camper. Fear not, by the end of this article, you will master the steps to effectively replace your camper’s rubber roof, ensuring a safe and dry haven for your next adventure.
Understanding the Basics of a Camper’s Rubber Roof
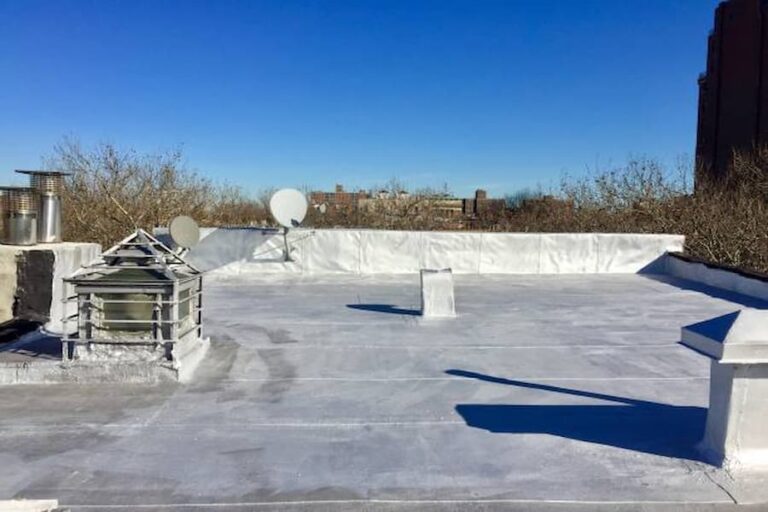
Before jumping into the process of replacing a rubber roof on a camper, it’s essential to understand its basic structure and function. A camper’s rubber roof, typically made of either Ethylene Propylene Diene Monomer (EPDM) or Thermal Poly Olefin (TPO), serves as a protective barrier against water, sunlight, and other environmental elements. It’s lightweight, flexible, and requires minimal maintenance.
However, over time, exposure to the elements can lead to wear and tear, causing leaks and potential damage to your camper’s interior. Therefore, knowing when and how to replace your camper’s rubber roof is crucial.
Necessary Tools and Materials for Rubber Roof Replacement
Having the right tools and materials in hand can make the process of replacing your camper’s rubber roof a lot smoother. Here’s a list of essential items you’ll need:
Tools:
- Utility knife
- Screwdriver
- Paint roller
- Seam roller
- Caulk gun
Materials:
- Replacement rubber roofing
- Roofing adhesive
- Self-leveling sealant
- Butyl tape
- Roofing screws
Remember, safety should be your priority. Make sure to wear safety glasses, gloves, and sturdy shoes during the roof replacement process.
Preparing Your Camper for Rubber Roof Replacement
Preparation is key to a successful rubber roof replacement. Begin by parking your camper on a flat, open space where you can work safely. Remove any personal items from the roof and clean it thoroughly to get rid of any accumulated grime or dirt. Next, inspect the roof for any signs of damage or wear and take note of these areas.
This will help you identify which parts need extra attention during the replacement process. After inspection, use a utility knife to cut around the edges of the existing rubber roof, making it easier to peel off. Remember to be gentle during this process as you don’t want to cause unnecessary damage to the underlying surface.
Removing the Old Rubber Roof: Step-by-Step Guide
Before installing a new rubber roof on your camper, it is essential to properly remove the existing one. This process may seem daunting at first, but with the right tools and a detailed guide, it can be a relatively straightforward task.
Begin by detaching any hardware or accessories that may interfere with your task, such as air conditioning units or satellite dishes. Next, use a scraper or putty knife to carefully remove the old rubber roofing material. Remember to take extra caution around vents and other delicate areas to avoid damage.
Once the old rubber roof is fully removed, thoroughly clean and inspect the roof deck for any damages. If you notice any water damage or rot, it is vital to repair these issues before proceeding to the installation of the new rubber roof.
Installing the New Rubber Roof: Detailed Process
After you’ve successfully removed the old rubber roof and addressed any necessary repairs, it’s time to install the new rubber roof. Begin by unrolling the new roofing material and positioning it on the roof of the camper. Ensure that the material is aligning correctly and covers all areas of the roof.
Once positioned correctly, fold back half of the roofing material and apply the appropriate adhesive to the roof deck. Ensure that you apply the adhesive evenly, avoiding any pooling or puddling.
After applying the adhesive, carefully lay the roofing material back down, using a roller to smooth out any bubbles or wrinkles. Repeat this process with the other half of the roof.
Once the roof is fully adhered, trim any excess material and reattach any accessories you removed in the first step.
Post-Installation Tips and Maintenance Advice for Your New Rubber Roof
After successfully installing your new rubber roof, it’s crucial to maintain it properly to ensure its longevity. Regularly clean the roof with a non-abrasive cleaner and soft-bristle brush to remove any dirt or debris.
Avoid walking on the roof more than necessary, as this can cause unnecessary wear and tear. If you must walk on the roof, wear soft-soled shoes and be careful not to damage the material.
Regularly inspect your roof for any signs of damage or wear, such as cracks or tears. If you notice any issues, it’s important to address them promptly to prevent any further damage.
Remember, proper maintenance can greatly extend the life of your new rubber roof, keeping your camper protected for years to come.
Conclusion
In conclusion, replacing a camper’s rubber roof need not be an intimidating task. With knowledge about the basics of a camper’s rubber roof, the right tools and materials, and a step-by-step guide on removal and installation, you can effectively replace your camper’s rubber roof.
Read More: How to replace RV Roof?
Post-installation maintenance tips will ensure the longevity of your new roof. Now, you are well-equipped to ensure a safe and dry camping experience. Happy camping!